If you've ever wondered: How do I add Post Views Counter on my blog on Blogspot? And go find out how to do on the internet to follow. There are many tutorials on how to make a visitor counter on the internet, but most of them are not updated, or only apply to unedited themes.
If you are using a commercial or edited blogspot theme other than the original standard blogspot theme, this is what you are looking for.
But, why need to add your blog post view counters if you already have it on "Dashboard"? Blogging is fun, and most of blogger wants to make their blog unique and good looking. Its purpose is for our readers to see which of our posts are viewed by others. It is also for us - the administrator, to track the post views on the front of our blog and to know which of our posts receive readers' attention and interest. Blogspot blogs can now easily add a post view counter because Firebase provides FREE service for everyone! We can now easily create this post view counter without worrying about servers or server code. Yes you heard it right, all BlogSpot blogs will now be able to display a dynamic count for individual pageviews. Follow the steps below to make it work!
Note: The postviews count wont change when you refresh the blog homepage but it will change only when you visit individual posts.
1. Creating your Firebase Account
Signup to Firebase with your gmail account.
*You will be redirected to your dashboard once you successfully signed up
Then, click "Creat a project" button to create your Firebase Project
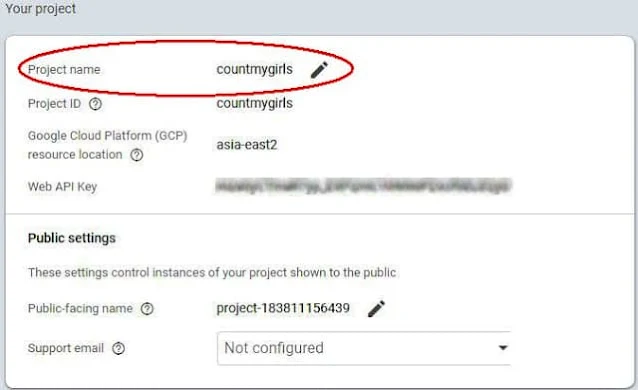
Choose a name for the project:
Select "Database" in the left menu ⇒ then Select "View" on "Realtime Database" ⇒ Rules:
delete all and replace with the following code as shown below:
Click "Publish" button.
The website will show a red warning "Your security rules are defined as public, so anyone can steal, modify, or delete data in your database" click Dismiss to ignore.
Now, return to Blogspot.
First top.showAuthor like this:
Second top.showAuthor:
Third top.showAuthor:
Paste This Script above </Body> in your html as shown below
Now just replace the highlighted line with your Firebase Project ID.
Save the script and then you can see the result.
*You will be redirected to your dashboard once you successfully signed up
Then, click "Creat a project" button to create your Firebase Project
Choose a name for the project:
The result will look like this:
OK, now we will create the Database:
Click Develop ⇨ Database ⇒ Creat database.
delete all and replace with the following code as shown below:
{ "rules": { ".read": true, ".write": true }}
Click "Publish" button.
The website will show a red warning "Your security rules are defined as public, so anyone can steal, modify, or delete data in your database" click Dismiss to ignore.
Now, return to Blogspot.
2. Add Post Views Counter in Blogspot Posts
- Go To Theme ⇨ Edit HTML
- Find top.showAuthor in html or you can find it with CTRL+F and write top.showAuthor then Enter.
There are two (or three) locations that appear "top.showAuthor". At those 2 or 3) positions, paste the script above all top.showAuthor as shown below:
<a expr:name='data:post.id'/> <i class='fa fa-eye'/> <span id='postviews'/> Views
First top.showAuthor like this:
Second top.showAuthor:
Third top.showAuthor:
Paste This Script above </Body> in your html as shown below
<script src='https://cdn.firebase.com/v0/firebase.js' type='text/javascript'></script> <script> $.each($("a[name]"), function(i, e) { var elem = $(e).parent().find("#postviews"); var blogStats = new Firebase("https://YOUR-PROJECT-ID.firebaseio.com/pages/id/" + $(e).attr("name")); blogStats.once("value", function(snapshot) { var data = snapshot.val(); var isnew = false; if(data == null) { data= {}; data.value = 0; data.url = window.location.href; data.id = $(e).attr("name"); isnew = true; } elem.text(data.value); data.value++; if(window.location.pathname!="/") { if(isnew) blogStats.set(data); else blogStats.child("value").set(data.value); } }); }); </script>
Now just replace the highlighted line with your Firebase Project ID.
Save the script and then you can see the result.
Source: Blog of Girls


I followed and it worked
ReplyDeleteNot work😴
ReplyDelete